NetoMeter Blog
Main Site >>
NetoMeter Blog
NetoMeter Blog
Latest Videos
  • Home
  • Windows Server
  • Exchange Server
  • SharePoint
  • Tools
    • ACMEExchange Client
Main Site >>
Monday, November 9, 2026
NetoMeter Blog
NetoMeter Blog
  • Main Site >>
  • Home
  • Windows Server
  • Exchange Server
  • SharePoint
  • Latest Videos
  • Upcoming
Main Site >>

©2024 NetoMeter All Right Reserved.
Office 365

Just Confirmed – One TB of OneDrive Storage on Office 365 Account

by admin July 16, 2014

Increasing OneDrive storage to 1 TB for Office 365 Home, Personal, University or Business subscribers has been announced June 2014. You can confirm the change by checking the storage metrics in your office 365 account:

1. Click on the Gear icon and choose “Site Settings”
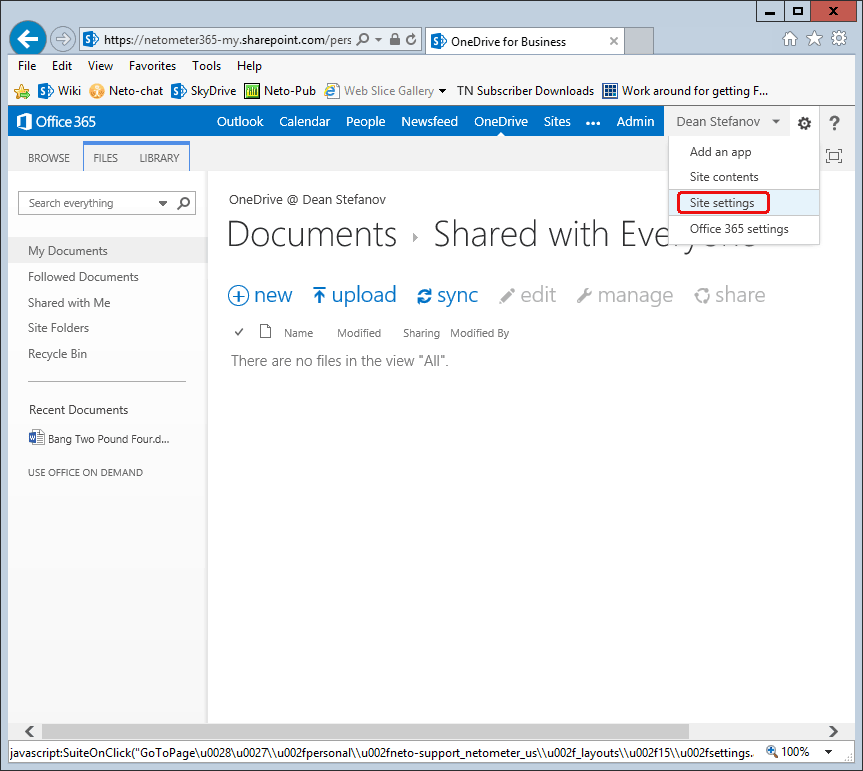
1 TB of OneDrive storage - Office 365

2.Then, choose “Storage Metrics” in the “Site Collection Administration” section
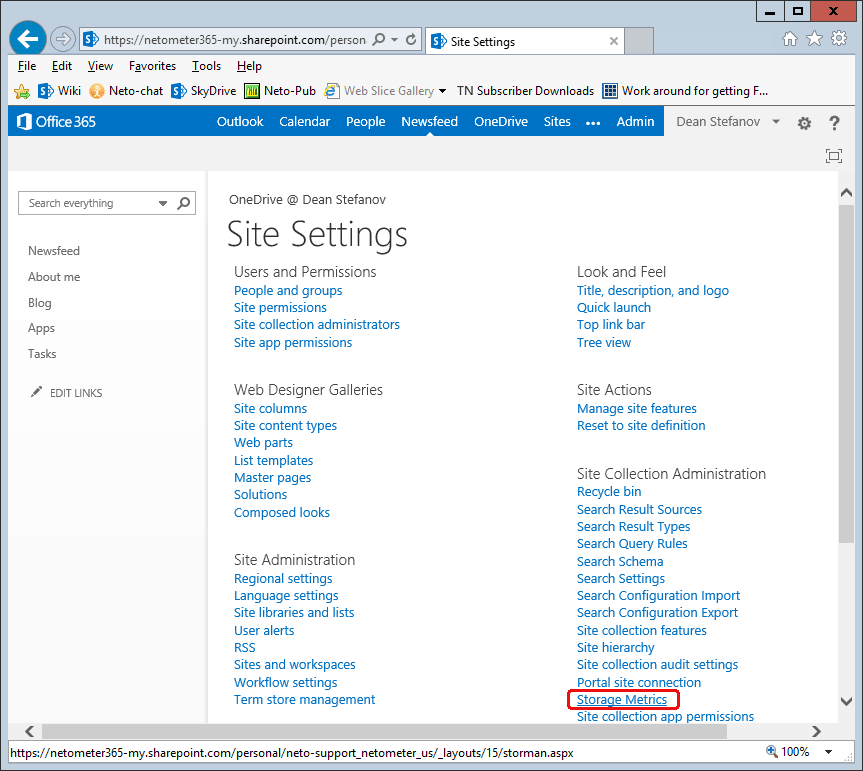
1TB-One-Drive-Office-365-2

3. Check your usage and total amount of free space
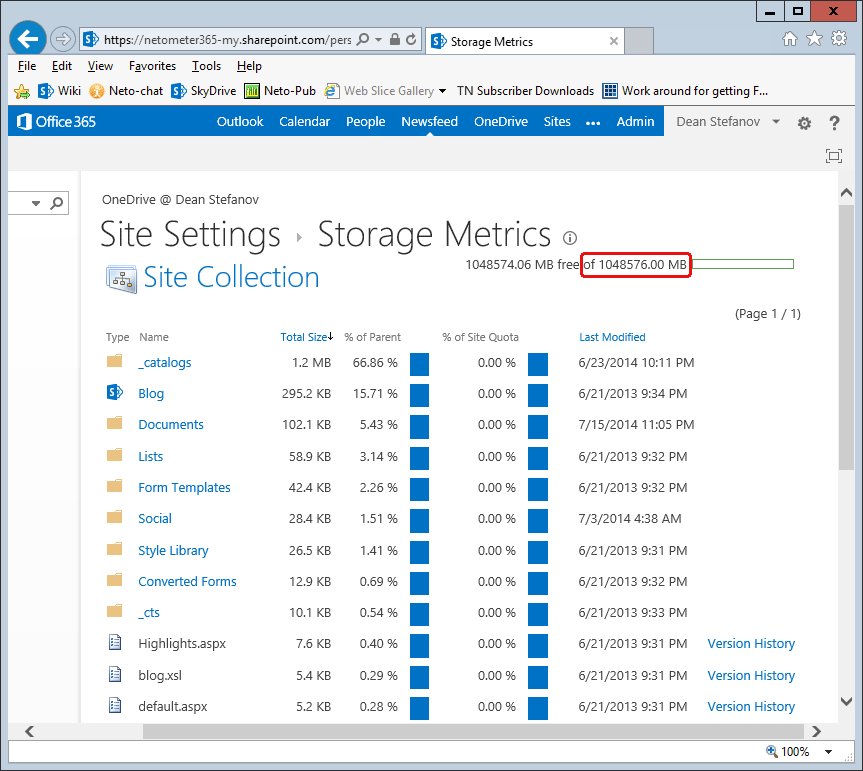
1TB-One-Drive-Office-365-3


Alternatively, you can simply right-click the OneDrive icon in the system tray and choose “Manage Storage”
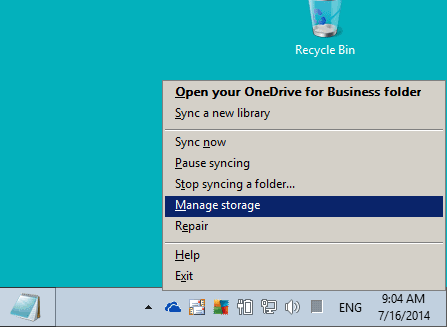
1TB-One-Drive-Office-365-4


Then, choose “View OneDrive for Business Storage”
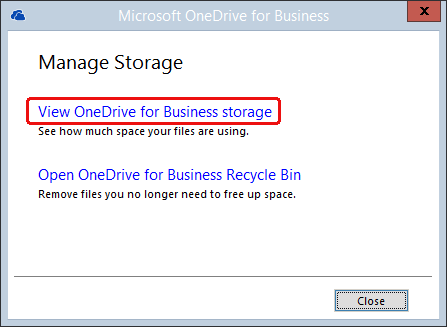
1TB-One-Drive-Office-365-5

0 FacebookTwitterPinterestLinkedinWhatsappTelegramViberEmail
Exchange Server 2013

Screencast: How to Complete Exchange 2013 Upgrade without Migrating the Public Folders

by admin June 22, 2014


Upgrade Videos:Exchange 2013 Tips and Tricks: “The public folder database cannot be deleted. Object is read only because it was created by a future version of Exchange.”
Upgrade to Exchange 2013 when:

  • There are no Public Folders
  • The existing Public Folders are not used anymore

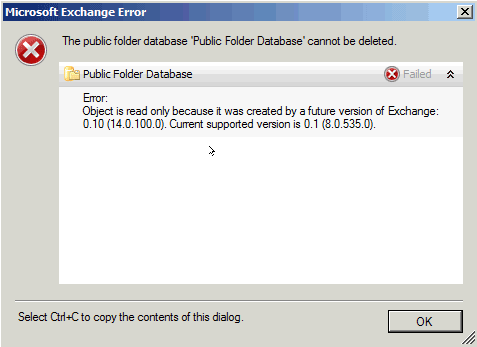
If you have no Public Folders to migrate (ex. there are just a few small ones – not used anymore), you might wonder how to complete the Exchange 2013 upgrade. Simply deleting recursively the existing Public Folders and trying to delete the PF Database results in the following error message:
The public folder database cannot be deleted

Dealing with the Public Folders has always been one of the most confusing parts of the Exchange upgrades, and that’s particularly true about Exchange 2013. Unfortunately, there isn’t much documentation about the case where you need to complete the upgrade process without migrating Public Folders. While using “ADSIEdit” has been the only option in the Exchange 2013 RTM version, Exchange 2013 CU1 and later allows you to perform this task in a friendly and safe manner.

In the following Screencast How to Upgrade to Exchange 2013 without Migrating Public Folders, we demonstrate how to complete the Exchange 2013 upgrade without migrating the Public Folders:

How to Upgrade to Exchange 2013 without Migrating Public Folders
  • How to Install Exchange 2013
  • How to Upgrade Exchange 2007 to Exchange 2013: Part1
  • How to Upgrade Exchange 2007 to Exchange 2013: Part2
  • How to Configure HTTP to HTTPS OWA Redirection in Exchange 2013

Tweet #Exchange2013 Follow @netometer

Stay tuned on NetoMeter – subscribe to NetoMeter RSS.

Dean

0 FacebookTwitterPinterestLinkedinWhatsappTelegramViberEmail
Free ScreencastsOffice 365

Video: How to Connect to Exchange Online Using Remote PowerShell. Adding a Domain and Bulk Modifying Email Addresses.

by admin June 15, 2014


Free Video :Office 365 Administration
Bulk Operations and Common Tasks

  • Add a Domain to Office 365 and Configure DNS Records
  • Edit PowerShell Profile and Automate Remote Connection to Office 365 and Exchange Online
  • Bulk Modify User Principal Names and Email Addresses

[floated align=”left”]Office 365[/floated] Admin Center is, usually, the preferred interface for performing administrative tasks. When it comes to bulk operations, though, PowerShell is the way to go. We’ve already demonstrated how to connect to Office 365 using remote PowerShell, and how to bulk create, license, and modify users. For your convenience, we’ve also demonstrated how to automate the process of connecting to Office 365 by creating/editing your PowerShell profile.

In this video, we go through the next logical steps:

  • Adding a domain
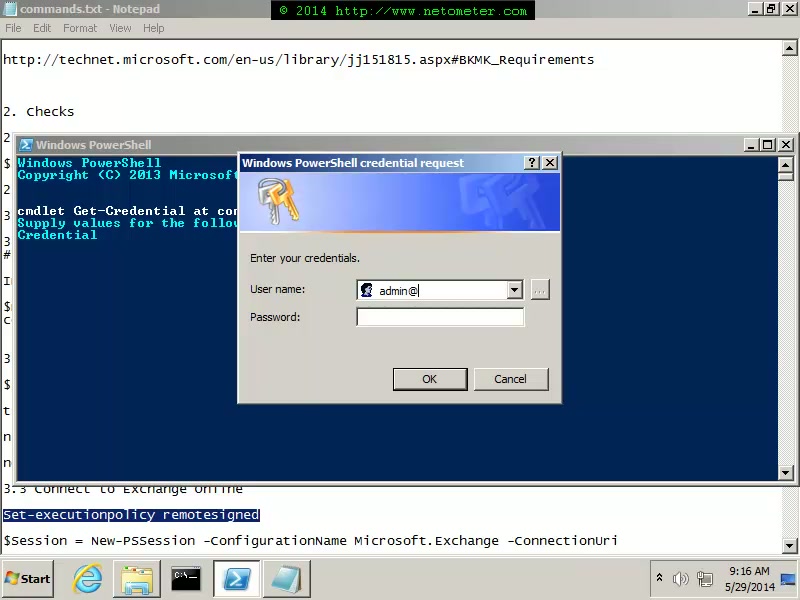
  • Configuring PowerShell for Remote Connection to Exchange Online
  • Exporting the Existing User Accounts to a CSV file
  • Bulk Editing User Principal Names and E-mail Addresses

===================
bulk-change-UPN.ps1
===================
# Import data from a CSV file and store it in a variable “$data”
$data = import-csv $args[0]
$Old_Domain = “NetoMeter.onmicrosoft.com”
$New_Domain = “3demo.com”
foreach ($i in $data)
{
$UPN = $i.UserPrincipalName
$New_UPN = $UPN -replace $Old_Domain, $New_Domain
Set-MsolUserPrincipalName -UserPrincipalName $UPN -NewUserPrincipalName $New_UPN
}

Again, we’ll be using PowerShell for the tasks that require performing bulk operations.
You can download the [tip label=”Text File with Commands” style=”1″ href=”https://www.netometer.com/blog/wp-content/uploads/Office-365-Commands.txt”]Office-365-Commands.txt Office-365-Commands.txt[/tip] and [tip label=”PowerShell script” style=”1″ href=”https://www.netometer.com/blog/wp-content/uploads/bulk-change-UPN.ps1″]bulk-change-UPN.ps1 bulk-change-UPN.ps1[/tip] that we are using in the demo.

How to Connect to Exchange Online Using Remote PowerShell - Bulk Set Email Address
  • How to Connect to Office 365 Using Remote PowerShell. Bulk Creating and Managing Users
  • Exchange 2013 – Custom Receive HubTransport Connector Problem
  • How to Bulk Create Mailboxes in Exchange 2013
  • How to Install Exchange 2013
0 FacebookTwitterPinterestLinkedinWhatsappTelegramViberEmail
Free ScreencastsVirtualization

Video: How to Remove a Hyper-V Server 2012 R2 from an Orphaned/Non-Existent Domain

by admin June 5, 2014

Warning: Undefined array key "default" in /var/www/blog.netometer.com/blog/wp-content/plugins/video-embed-thumbnail-generator/src/public/videopack-public.php on line 1325


Free Video :Hyper-V Server 2012 R2 – How to Rejoin a Domain
Hyper-V Server Cannot be Removed from a Non-Existent Domain:

  • “The specified domain either does not exist or could not be contacted.”
  • “The machine is already joined to the domain”

[floated align=”left”]Hyper-V Server 2012 R2[/floated] is normally used as a member of a domain. It is not uncommon to get in a situation where you need to unjoin/remove the Hyper-V server from the domain it is a member of. If the domain is available and there is normal connectivity, the whole process should be pretty simple. Surprisingly, if the original domain does not exist anymore, you get yourself into a Catch-22 situation – when you try to join the server to a different domain or a workgroup, you get one of the following error messages:

  • “The machine is already joined to the domain.”
  • “The specified domain either does not exist or could not be contacted.”

As you will see in the following video, the solution to this issue is pretty straightforward – you need to unjoin the server from command line using the FORCE parameter. One small detail, which is often forgotten, is to check whether you have access to the local admin account, and more importantly, whether this account is enabled. Again, this should be performed from command line.

How to Remove a Hyper-V Server 2012 R2 from an Orphaned/Non-Existent Domain
===========================================================================
#Check the list of local user accounts:
NET USER

#Reset the local admin password:
NET USER administrator “THE_NEW_PASSWORD”

#Get the details for a specific account
NET USER administrator

#Enable a disabled user account:
NET USER administrator /active:yes

#Create a new user account:
NET USER HV-Admin “THE_PASS” /add

#Remove a Hyper-V Server 2012 R2 from an orphaned domain
NETDOM REMOVE /d:nonexistentdomain.com HyperV-ServerName /FORCE

You can download the [tip label=”Text File with Commands” style=”1″ href=”https://www.netometer.com/blog/wp-content/uploads/HyperV-12R2-Commands.txt”]Hyper-V-Commands.txt How to Unjoin Hyper-V Server from Non-Existent Domain[/tip] that we are using in the demo.

Remove Hyper-V Server 2012 R2 from Non-Existent Domain

  • “Discovery Search Mailbox has been corrupted” error when upgrading from Exchange 2007 to Exchange 2013
  • Exchange 2013 – Custom Receive HubTransport Connector Problem
  • How to Bulk Create Mailboxes in Exchange 2013
  • How to Install Exchange 2013
0 FacebookTwitterPinterestLinkedinWhatsappTelegramViberEmail
Office 365

Screencast: How to Connect to Office 365 Using Remote PowerShell. Bulk Creating and Managing Users.

by admin June 4, 2014

Being constantly improved and updated with new features, the Office 365 Admin Center is quite often the preferred management interface. Sooner or later, you stumble upon tasks that require performing bulk operations – like creating users, licensing them based on CSV file, or simply populating/editing the users’ data.

While some of these bulk operations can be performed in the graphical interface (depending on the Office 365 Plan), connecting to Office 365 and using remote PowerShell will get the job done faster and, surprisingly, easier.

If you are doing this for the first time, finding and installing the right packages for your system (especially if you are running Windows 7) is the first task. Some of the packages are updated and replaced with a new version which comes, of course, with a new name – ex. “Microsoft Azure Active Directory Module for Windows PowerShell”, while most of the instructions that you will find are referring to “Microsoft Online Services Module for Windows PowerShell”.

For your convenience, we’ve demonstrated how to automate the whole process by editing your PowerShell profile and placing the required commands in it. In our demo, we are trying to keep things as simple as possible. You will not find one-liners, and you can easily edit the scripts (which can be downloaded from our site) and modify them according to your needs.

[raw]In this Screencast How to Connect to Office 365 Using Remote PowerShell, and how to bulk create, license, and Modify Users., we demonstrate how to connect to Office 365 using remote PowerShell, and how to bulk create, license, and modify users.[/raw]

How to Connect to Office 365 Using PowerShell
  • How to Connect to Exchange Online Using Remote PowerShell. Adding a Domain and Bulk Modifying Email Addresses.
  • How to Upgrade Exchange 2007 to Exchange 2013: Part2
  • Exchange 2013 Initial Configuration
  • How to Install and Configure Exchange 2013 Edge Server. Adding SpamHaus and Barracuda as IP Block List Providers.

Tweet #Office365 Follow @netometer

Stay tuned on NetoMeter – subscribe to NetoMeter RSS.

Dean

0 FacebookTwitterPinterestLinkedinWhatsappTelegramViberEmail
Exchange Server 2013Latest Screencasts

Screencast: How to Install and Configure Exchange 2013 Edge Server. Adding SpamHaus and Barracuda as IP Block List Providers.

by admin May 24, 2014

Exchange 2013 Edge server adds an extra layer of security to your network. It is handling all inbound and outbound mail flow and is placed, usually, in a DMZ – in its own workgroup.

In this Screencast How to Install and Configure Exchange 2013 Edge Server. Adding SpamHaus and Barracuda as IP Block List Providers., we demonstrate how to install and configure Exchange 2013 Edge server in a perimeter network (DMZ). In addition, you will see how to pretest and configure two of the most popular real-time block list providers (RBL) – SpamHaus and Barracuda.

[raw]For your convenience, we have published the text file with the commands that we are using in the Screencast here .[/raw]

How to Install and Configure Exchange 2013 Edge Server. Adding SpamHaus and Barracuda as IP Block List Providers.
  • How to Install Exchange 2013
  • How to Upgrade Exchange 2007 to Exchange 2013: Part2
  • Exchange 2013 Initial Configuration
  • How to Install and Configure Exchange 2013 Edge Server. Adding SpamHaus and Barracuda as IP Block List Providers.

Tweet #Exchange2013 Follow @netometer

Stay tuned on NetoMeter – subscribe to NetoMeter RSS.

Dean

0 FacebookTwitterPinterestLinkedinWhatsappTelegramViberEmail
Letsencrypt Windows Client
UpcomingWindows Server 2012

How to Install a Let’s Encrypt Free SSL Certificate on Windows Server (IIS)

by admin May 23, 2014

In this upcoming Screencast, we will demonstrate how to install a Let’s Encrypt SSL certificate on Windows Servers running IIS. The demonstration will cover Server 2012 R2, Server 2008 R2, and Server 2016. We will explain in details:

  • the installation and configuration of the Let’s Encrypt windows ACME client
  • requesting and installing single domain certificates for multiple sites
  • requesting and installing a multi domain (SAN) certificate
  • the process of the automatic certificate renewal


Let’s Encrypt CALet’s Encrypt is a free, automated, and open certificate authority brought to you by the Internet Security Research Group (ISRG). It entered public beta in September 2015 and completed it successfully on April 12th,2016, issuing more than 1.7 million certificates for more than 3.8 million websites. The project is sponsored by Mozilla, Akamai, Cisco, Chrome …

Letsencrypt Windows Client

0 FacebookTwitterPinterestLinkedinWhatsappTelegramViberEmail
Exchange Server 2013

How to Install a GoDaddy Multiple Domain Certificate in Exchange 2013

by admin May 23, 2014

By default, Exchange setup generates and assigns to Exchange services a self-signed multiple domain certificate, which has five years validity and contains just the internal Exchange short (NetBIOS) and AD Fully Qualified Domain Name (FQDN). As you can expect, this certificate is not trusted by the local and remote clients. In addition, it doesn’t include the Exchange server public and autodicover names which makes it unusable for remote Outlook Anywhere clients. The self-signed certificate is a temporary solution and needs to be replaced as soon as possible.

In this Screencast How to Install a GoDaddy Multiple Domain Certificate in Exchange 2013, we demonstrate how to configure the Exchange 2013 URL and how to install a GoDaddy UCC.

[raw]For your convenience, we have published the text file with the commands that we are using in the Screencast here .[/raw]

How to Install a GoDaddy Multiple Domain Certificate in Exchange 2013
  • How to Install Exchange 2013
  • How to Upgrade Exchange 2007 to Exchange 2013: Part2
  • Exchange 2013 Initial Configuration
  • How to Install and Configure Exchange 2013 Edge Server. Adding SpamHaus and Barracuda as IP Block List Providers.

Tweet #Exchange2013 Follow @netometer

Stay tuned on NetoMeter – subscribe to NetoMeter RSS.

Dean

0 FacebookTwitterPinterestLinkedinWhatsappTelegramViberEmail
Exchange Server 2013

Screencast: How to Configure HTTP to HTTPS OWA Redirection in Exchange 2013

by admin May 22, 2014

In this Screencast How to Configure HTTP to HTTPS OWA Redirection in Exchange 2013, we demonstrate how to perform automatic HTTP to HTTPS redirection to the default Exchange 2013 OWA page. Instead of facing the “Page can’t be displayed”, or even worse – the “403 Forbidden: You do not have permission to view this directory or page using the credentials that you supplied”, clients are silently redirected to the OWA sign in page.

[raw]The provided instructions work both in Server 2012/IIS8 and Server 2012 R2/IIS8.5.[/raw]

How to Configure HTTP to HTTPS OWA Redirection in Exchange 2013

How to Configure HTTP to HTTPS OWA Redirection in Exchange 2013

  • How to Install Exchange 2013
  • How to Upgrade Exchange 2007 to Exchange 2013: Part2
  • Exchange 2013 Initial Configuration
  • How to Install and Configure Exchange 2013 Edge Server. Adding SpamHaus and Barracuda as IP Block List Providers.

Tweet #Exchange2013 Follow @netometer

Stay tuned on NetoMeter – subscribe to NetoMeter RSS.

Dean

0 FacebookTwitterPinterestLinkedinWhatsappTelegramViberEmail
Windows Server 2012

Screencast: How to Configure Storage Tiers – Server 2012 R2

by admin February 18, 2014

In the following Screencast How to Configure Storage Tiers and Write-Back Cache in Server 2012 R2, we demonstrate how to configure Storage Tiers in Server 2012 R2 using SSD and Hard Drives within the same storage pool.

The whole process of configuring Storage Tiers with Server 2012 R2 is extremely simplified when using the graphical interface – Server Manager, and that’s what you will see in most demos. We do start with such an example in our Screencast, and then we take a closer look at some of the important Virtual Disk parameters (Number of Columns, Interleave, Write-Back Cache) that are configured automatically in the background by the wizard and affect most seriously the Storage Space performance. As you will find out, once the Virtual Disk is created, you cannot modify these parameters. The only way to change them is to delete and re-create the Virtual Disk. That brings the need to plan carefully, in advance your Storage Configuration.

We discuss in detail the meaning of these parameters and how to optimize them according to your needs in Step 2. Extending an existing tiered Storage Space is one of the typical examples when you need to be aware of these parameters before you proceed with adding the physical disks to the Storage Pool, and we demonstrate some of the most common mistakes.

While the Graphical Interface is perfect for demonstration purposes, most probably you will have to use PowerShell when implementing Tiered Storage in a production environment. Optimizing the interleave for applications like Microsoft SQL Server or Exchange Server, configuring the Number of Columns, and setting the Write-Back Cache is possible only in PowerShell. Step 3 is packed with tips and PowerShell action, and for you convenience we provide the text file with all commands that are used in the demo.

How-to-Configure-Storage-Tiers-Server-2012-R2

Tweet #Server2012R2 Follow @netometer

  • How to Configure DHCP Failover in Windows Server 2012
  • How to Migrate DHCP Server to Windows Server 2012
  • How to Upgrade Active Directory Domain to Windows Server 2012
  • How to Add a Second Server 2012 Domain Controller
  • How to Install WordPress on Windows Server 2012
0 FacebookTwitterPinterestLinkedinWhatsappTelegramViberEmail
Newer Posts
Older Posts
November 2026
M T W T F S S
 1
2345678
9101112131415
16171819202122
23242526272829
30  
« Nov    

NetoMeter Blog

  • Video Updates
  • Upcoming Videos
  • Community Chatrooms
  • Community Forum
Facebook Twitter Rss Envelope

Useful Links

    • Contact Us
    • Collaboration
    • Adverstising
    • Privacy Policy
    • Feedback
    • Terms of Use
    • Help & Support
    • News Covering
    • Trending Now

Edtior's Picks

ACMEExchange Let’s Encrypt Client: How to Install a LE Certificate in Exchange Server
Coming Soon: How to Migrate File Servers to Server 2022
Screencast (Part 2): How to Upgrade from Exchange 2013 to Exchange 2019

Latest Articles

ACMEExchange Let’s Encrypt Client: How to Install a LE Certificate in Exchange Server
Coming Soon: How to Migrate File Servers to Server 2022
Screencast (Part 2): How to Upgrade from Exchange 2013 to Exchange 2019
Screencast: How to Upgrade from Exchange 2013 to Exchange 2019
NetoMeter Blog
  • Home
  • Windows Server
  • Exchange Server
  • SharePoint
  • Tools
    • ACMEExchange Client
NetoMeter Blog
  • Main Site >>
  • Home
  • Windows Server
  • Exchange Server
  • SharePoint
  • Latest Videos
  • Upcoming
©2024 NetoMeter All Right Reserved.