NetoMeter Blog
Main Site >>
NetoMeter Blog
NetoMeter Blog
Latest Videos
  • Home
  • Windows Server
  • Exchange Server
  • SharePoint
  • Tools
    • ACMEExchange Client
Main Site >>
Monday, November 9, 2026
NetoMeter Blog
NetoMeter Blog
  • Main Site >>
  • Home
  • Windows Server
  • Exchange Server
  • SharePoint
  • Latest Videos
  • Upcoming
Main Site >>

©2024 NetoMeter All Right Reserved.
Exchange Server 2010

Screencast (Updated): How to Renew Exchange 2010 Multiple Domain Certificate (GoDaddy UCC)

by admin February 18, 2014


Exchange 2010How to renew Exchange 2010 Multiple Domain Certificate – Updated to comply with the new CA/Browser Forum requirements

Certificate Authorities, browsers, and industry groups are constantly improving standards. The updated Baseline Requirements for the issuance of certificates (BR v1.1.6) include some of the changes that you might find out when requesting a new certificate or renewing an existing one.

Baseline Requirements for the Issuance and Management of Publicly-Trusted Certificates, Version 1.1.6
Adopted by CA/Browser Forum (includes over 30 CA members and major browser vendors: Microsoft, Apple, Mozilla, Google, Opera) Effective as of July 29, 2013
• CA SHALL NOT issue a certificate with an Expiry Date later than 1 November 2015 with a SAN or Subject Common Name field containing a Reserved IP Address or Internal Server Name


• Effective 1 October 2016, CAs SHALL revoke all unexpired Certificates whose SAN or Subject Common Name field contains a Reserved IP Address or Internal Server Name

In the updated version of our Screencast [Updated] How to Renew Exchange 2010 Multiple Domain Certificate (GoDaddy UCC), we address these requirements by:
• Configuring Split-Brain DNS or Pin-Point DNS zones on the local network. We demonstrate both approaches, so you can choose the one that fits better your needs.
• Modifying the Exchange 2010 internal URL
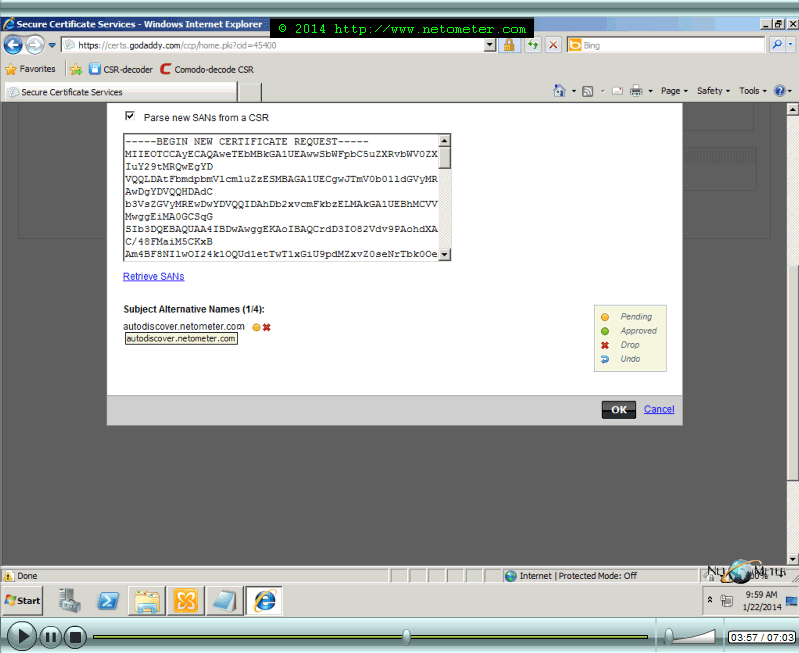
• Requesting and installing a GoDaddy Multiple Domain certificate (UCC) that doesn’t use our Internal Server’s name.

Tweet #Exchange2010 Follow @netometer
Updated-How-to-Renew-Exchange-2010-Certificate

  • Exchange 2013 Initial Configuration
  • How to Exclude Mailboxes from Automatic Mailbox Distribution in Exchange 2013
  • How to Install Exchange 2013
  • How to Configure Outlook Anywhere in Exchange Server 2007
  • How to Install WordPress on Windows Server 2012
0 FacebookTwitterPinterestLinkedinWhatsappTelegramViberEmail
Upcomming Screencast: Exchange 2013 Initial Configuration
Exchange Server 2013

Screencast: How to Perform Exchange Server 2013 Initial Configuration

by admin February 16, 2014

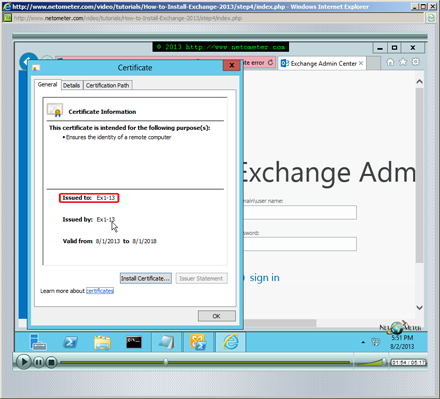
In this Screencast we demonstrate how to perform Exchange Server 2013 initial configuration. We start with non-critical tasks, like getting rid of the certificate warning in Exchange Admin Center and creating a new Exchange toolbar. Then, we go through the process of adding Accepted Domains, configuring e-mail address policies, and creating connectors.

Every organization that sends and receives e-mails should have a valid postmaster address (according to RFC 5321). It is quite common to have different internal and public domain names. By default, the External Postmaster address field is blank which effectively sets the postmaster’s address to use the default (internal) accepted domain, and we configure it manually to use our public domain name.

One of the important tasks in Exchange 2013 initial configuration is creating mailboxes for existing users. Exchange Admin Center does not provide an option to bulk create mailboxes for existing users in Active Directory. We demonstrate an easy way to automate this task in Exchange Management Shell.

Tweet #Exchange2013 Follow @netometer

Upcomming Screencast: Exchange 2013 Initial Configuration

  • (Updated) How to Renew Exchange 2010 Multiple Domain Certificate – GoDaddy UCC
  • Exchange 2013 – Custom Receive HubTransport Connector Problem
  • How to Bulk Create Mailboxes in Exchange 2013
  • How to Install Exchange 2013


0 FacebookTwitterPinterestLinkedinWhatsappTelegramViberEmail
Exchange Server 2013Free Screencasts

Video: Exchange 2013 Upgrade – Running Get-OrganizationConfig in Exchange 2007 Management Shell Generates a Warning About Exchange Recipient Object Name

by admin January 15, 2014


Free Video :Exchange 2013 Upgrade – Common Errors and Mistakes
Running “Get-OrganizationConfig” in Exchange 2007 Management Shell generates the following warning:

WARNING: Display Name of the Exchange Recipient object should be Microsoft Exchange. Run Set-OrganizationConfig with no parameters to correct the Display Name value.

[floated align=”left”]Exchange 2013 Upgrade[/floated] Migrating the Public Folders is one of the major steps when upgrading from Exchange 2007 to Exchange 2013, and we demonstrate this in [tip label=”Part 2” style=”1″ href=”https://www.netometer.com/video/tutorials/How-to-Upgrade-Exchange-2007-to-Exchange-2013-Part2″]Screencast: How to Upgrade Exchange 2007 to 2013 P2 [/tip] of our Exchange 2007 to 2013 upgrade Screencast.

One of the prerequisites checks that you need to perform is running “Get-OrganizationConfig” in Exchange 2007 Management Shell and confirming that there is no previous successful Public Folders migration. At that point, you get a warning about the Display Name of the Exchange Recipient Object. As it turns out, the name of this object in Exchange 2007 is “Microsoft Exchange”. Once you install Exchange 2013 into your organization, this name is modified to “Microsoft Outlook”.

You should completely ignore this warning, even though it suggests to set back the object’s name by running “Set-OrganizationConfig” without parameters.

In this video, we demonstrate what happens when you get this warning and modify accidentally the Display Name of the Exchange Recipient Object, and how to set it back to Exchange 2013 default value – “Microsoft Outlook”.

WARNING: Display Name of the Exchange Recipient object should be Microsoft Exchange
  • Exchange 2013 Initial Configuration
  • Exchange 2013 – Custom Receive HubTransport Connector Problem
  • How to Bulk Create Mailboxes in Exchange 2013
  • How to Install Exchange 2013
0 FacebookTwitterPinterestLinkedinWhatsappTelegramViberEmail
Exchange Server 2013Free Screencasts

Video: Exchange 2013 – Removing the Default Self-Signed Certificate Problem

by admin January 13, 2014


Free Video :Exchange 2013 – Common Errors and Mistakes

After removing the default self-signed certificate from a multi-role server:

  • Exchange Management Shell fails with: “The WinRM Shell client cannot process the request”
  • Exchange Admin Center presents the authentication page and then fails to open the EAC page

[floated align=”left”]Exchange 2013[/floated] comes out of the box with a self-signed certificate, assigned to the Default and Back End Web sites. The recommended practice is to replace it with a trusted Multiple Domain certificate (UCC), and we demonstrate this in [tip label=”Part 2” style=”1″ href=”https://www.netometer.com/video/tutorials/How-to-Upgrade-Exchange-2007-to-Exchange-2013-Part2″]Screencast: How to Upgrade Exchange 2007 to 2013 P2 [/tip] of our Exchange 2007 to 2013 upgrade Screencast.

Once you install the new certificate and assign the Exchange services to it, you have to decide what to do with the self-signed certificate which you have just replaced (usually in Exchange Admin Center).

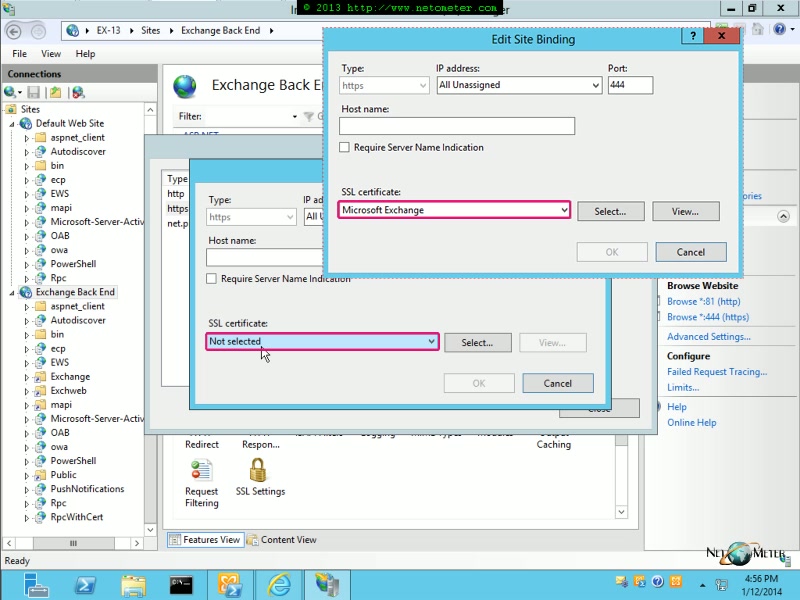
As you will see in this video, deleting the Exchange 2013 self-signed certificate on a multi-role server will get you in trouble. The problem is specific to servers hosting the Mailbox and CAS roles and results in a failure to open Exchange Management Shell (EMS) or Exchange Admin Center (EAC). The fastest way to resolve this issue is to assign a certificate to the Back End website in IIS manager.

Exchange 2013: Deleting Self-Signed Certificate Problem
  • “Discovery Search Mailbox has been corrupted” error when upgrading from Exchange 2007 to Exchange 2013
  • Exchange 2013 – Custom Receive HubTransport Connector Problem
  • How to Bulk Create Mailboxes in Exchange 2013
  • How to Install Exchange 2013
0 FacebookTwitterPinterestLinkedinWhatsappTelegramViberEmail
Exchange Server 2013Free Screencasts

Video: Exchange 2013 – Custom Receive HubTransport Connector Problem

by admin January 11, 2014


Free Video :Exchange 2013 Upgrade – Common Errors and Mistakes

Creating a Custom HubTransport Connector on Exchange 2013 Multirole Server Results in:

421 4.3.2 Service not available

Connection to host lost

[floated align=”left”]Exchange 2013 Upgrade[/floated]In [tip label=”Part 1” style=”1″ href=”https://www.netometer.com/video/tutorials/How-to-Upgrade-Exchange-2007-to-Exchange-2013″]Screencast: How to Upgrade Exchange 2007 to 2013 P1 [/tip] and [tip label=”Part 2” style=”1″ href=”https://www.netometer.com/video/tutorials/How-to-Upgrade-Exchange-2007-to-Exchange-2013-Part2″]Screencast: How to Upgrade Exchange 2007 to 2013 P2 [/tip] of our Exchange 2007 to 2013 upgrade Screencast, we demonstrate step-by-step the whole upgrade process. In a series of short videos, we will cover some of the most common mistakes, warnings and errors that you might get during this upgrade.

In this video we demonstrate one of the common problems that you might hit when creating new (or re-creating existing Exchange 2007) Custom Receive Connectors in Exchange 2013 Multirole Servers. In our example, we are creating a Custom Relay connector which allows relaying for a specific internal host/application. The problem occurs when you choose the “HubTransport role” for the connector type. In this case, the Default Frontend connector, which is the common messaging entry point for the organization, closes connections from remote email servers with “421 4.3.2 Service not available” and effectively rejects accepting inbound e-mails. As you can see, the solution is to delete the Custom HubTransport Receive connector and re-create it again as a FrontendTransport connector.

Exchange 2013 - Custom Receive HubTransport Connector Problem
  • “Discovery Search Mailbox has been corrupted” error when upgrading from Exchange 2007 to Exchange 2013
  • How to Bulk Create Mailboxes in Exchange 2013
  • How to Install Exchange 2013
  • How to Install WordPress on Windows Server 2012
0 FacebookTwitterPinterestLinkedinWhatsappTelegramViberEmail
Exchange Server 2013Free Screencasts

Video: “Discovery Search Mailbox has been corrupted” error when upgrading from Exchange 2007 to Exchange 2013

by admin January 9, 2014


Free Video :Exchange 2013 Upgrade – Common Errors and Mistakes

Warning:
Object netometer.local/Users/DiscoverySearchMailbox
{D919BA05-46A6-…} has been corrupted and it is in
an inconsistent state. The following validation errors have occurred:

Warning:
The value of property ‘RecipientTypeDetails’, 536870912, is not defined in the
Enum type ‘RecipientTypeDetails’.

[floated align=”left”]Exchange 2013 Upgrade[/floated]In [tip label=”Part 1” style=”1″ href=”https://www.netometer.com/video/tutorials/How-to-Upgrade-Exchange-2007-to-Exchange-2013″]Screencast: How to Upgrade Exchange 2007 to 2013 P1 [/tip] and [tip label=”Part 2” style=”1″ href=”https://www.netometer.com/video/tutorials/How-to-Upgrade-Exchange-2007-to-Exchange-2013-Part2″]Screencast: How to Upgrade Exchange 2007 to 2013 P2 [/tip] of our Exchange 2007 to 2013 upgrade Screencast, we have demonstrated step-by-step the whole upgrade process. In a series of short videos, we will cover some of the most common mistakes, warnings and errors that you might get during this upgrade.

One of the common warnings that you might get is about a corrupted Discovery Search Mailbox. As you can see in this short video, this warning appears in Exchange 2007 Management Console right after the Exchange 2013 installation.

There are no Discovery Search Mailboxes in Exchange 2007, and this mailbox is created by Exchange 2013 setup. The ‘RecipientTypeDetails’ 536870912 is the correct value and you should not modify it in ADSIEDIT or delete and recreate the mailbox as suggested by some guides. Exchange 2007 is not aware of such RecipientType and hence, the warning message which you should completely ignore.

Exchange2007-Corrupted-Discovery-Search-Mailbox
  • How to Bulk Create Mailboxes in Exchange 2013
  • How to Install Exchange 2013
  • How to Upgrade from Exchange 2007 to Exchange 2013: Part 1
  • How to Install WordPress on Windows Server 2012
0 FacebookTwitterPinterestLinkedinWhatsappTelegramViberEmail
Exchange Server 2013

Screencast: How to Upgrade Exchange 2007 to 2013 – Part 2

by admin January 5, 2014
Part 2:

  • Prepare Exchange 2013 – rename DB, move DB and logs to separate volumes, configure Send/Receive connectors, import Exchange 2007 transport rules
  • Configure Exchange 2013 URL and Outlook Anywhere
  • Request and Install a GoDaddy Multiple Domain Certificate (UCC) in Exchange 2013
  • Import the new GoDaddy Certificate in Exchange 2007, configure Split-Brain DNS or PinPoint DNS zones
  • Configure Exchange 2007 URL and double check the Outlook Anywhere configuration
  • Perform the Switchover – enable the new certificate on Exchange 2007, check the autodiscover information provided to local clients, change firewall rules, test with remote OWA, Outlook Anywhere, and Web Services clients
  • Move the Mailboxes to Exchange 2013
  • Move the Public Folders to Exchange 2013
  • Decommission Exchange 2007

[floated align=”left”]Exchange 2013 Upgrade[/floated]We have published the second (and last) part of our  [tip label=”Screencast” style=”1″ href=”https://www.netometer.com/video/tutorials/How-to-Upgrade-Exchange-2007-to-Exchange-2013-Part2″]Screencast: How to Upgrade Exchange 2007 to 2013 P2 [/tip]. As you might expect, this is where the upgrade process gets really complex and, correspondingly, we have split the screencast into nine steps.

One of the corner stones of the successful upgrade is configuring correctly the Exchange URL and implementing successfully the legacy namespace for local and remote clients. If you stumble on this task for the first time, it’s easy to get utterly confused with the multitude of FQDN that need to be set on both the legacy and the new Exchange servers. Add to this equation the need to request a new Exchange certificate and take care of the name resolution for local and remote clients, and you come up with the “logical” conclusion to save time and simplify the whole process by performing the upgrade without using the legacy namespace. Unfortunately, this turns out to be the wrong choice where you get a significant amount of downtime and a ton of complaints from the local users.

One of the popular misconceptions is that the legacy namespace is used only by remote clients and you can easily live with cutting them out for a weekend. Keep in mind that all internal clients will switch to Outlook Anywhere and, of course, you will end up with a period when resources are shared on both servers (ex. Exchange 2013 mailboxes accessing Exchange 2007 Public Folders). On the other hand, configuring the URL takes a minute or two – we provide the text file with the commands, just do you homework first. Add a couple of DNS records, and GoDaddy generates the requested certificate normally within 5 minutes.

Moving the Public Folders to Exchange 2013 will be a memorable moment in your career. At first glance, you might find the whole process quite indigenous ingenious. When you see the logic behind, it is as simple and user unfriendly as possible. Quite often, the reason that you get stuck after locking the Exchange 2007 Public Folders is because you haven’t waited until the lock took effect and proceeded immediately with completing the PF migration. If you get in this situation, shut down the Exchange 2007 server for a couple of minutes – normally, you will get “Network Failure” when you check the Migration Request Statistics in Exchange 2013 management shell. Then, turn it on and resume the PF migration request.

Finally, there are cases when you don’t need to migrate the Public Folders as they are not used anymore. Please, don’t take the hatchet (ADSIEDIT) and start hacking as suggested by some specialists. There is a polite and intelligent way to finalize your upgrade without migrating the Exchange 2007 Public Folders, and we’ll be publishing a video on this topic within days.

[raw]In this Screencast How to Upgrade Exchange 2007 to 2013: Part 2, we complete the upgrade from Exchange 2007 to Exchange 2013.[/raw]

How to Upgrade Exchange 2007 to Exchange 2013: Part 2
How-to-Upgrade-Exchange-2007-to-Exchange-2013-Part2
  • How to Install Exchange 2013
  • How to Upgrade Exchange 2007 to Exchange 2013: Part1
  • How to Configure Outlook Anywhere in Exchange Server 2007

Tweet #Exchange2013 Follow @netometer

Stay tuned on NetoMeter – subscribe to NetoMeter RSS.

Dean

0 FacebookTwitterPinterestLinkedinWhatsappTelegramViberEmail
Free ScreencastsWindows Server 2012

Video: How to Install WordPress on Windows Server 2012

by admin September 28, 2013


Free Video : How to Install WordPress on Server 2012

  • PHP 5.4
  • MySQL 5.1
  • WordPress 3.6

We have already demonstrated how to install WordPress on Windows Server 2008Screencast: How to install WordPress on Windows Server 2008 How to Bulk Create Mailboxes in Exchange 2013. This used to be a complex process and required a lot of efforts. Choosing the correct components and their configuration was a challenge.

In contrast, installing WordPress on Server 2012 is a pleasant and straightforward task. The whole process is fully automated with [tip label=”Microsoft Web Platform Installer” style=”1″ href=”https://www.netometer.com/downloads/powershell/bulk-create-mbx.ps1″]Download: Microsoft Web Platform Installer 4.6 How to Bulk Create Mailboxes in Exchange 2013[/tip].

[ulist style=”8″]
Choosing the Web Site for our WordPress installation
Updating WordPress to the latest version
Configuring the Host name for WP
Installing and Activating a new WP theme
[/ulist]

[raw]In the following video How to Bulk Create Mailboxes in Exchange 2013, we demonstrate how to Install and configure WordPress on Windows Server 2012.[/raw]
Tweet #Server2012 Follow @netometer

How to Install WordPress on Server 2012 (IIS 8)
  • How to Bulk Create Mailboxes in Exchange 2013
  • How to Exclude Mailboxes from Automatic Mailbox Distribution in Exchange 2013
  • How to Install Exchange 2013
  • How to Upgrade from Exchange 2007 to Exchange 2013: Part 1
0 FacebookTwitterPinterestLinkedinWhatsappTelegramViberEmail
Exchange Server 2013Free Screencasts

Video: How to Exclude Mailboxes from Automatic Mailbox Distribution in Exchange 2013

by admin September 25, 2013


Free Video :Exchange 2013 Administration – Configuring Mailbox Provisioning Parameters

  • IsExcludedFromProvisioning
  • IsExcludedFromInitialProvisioning
  • IsSuspendedFromProvisioning

In our previous videoBulk Create Mailboxes in Exchange 2013 How to Bulk Create Mailboxes in Exchange 2013, we have demonstrated how to bulk create user mailboxes in Exchange 2013.  When you do not specify explicitly a destination mailbox database, Exchange 2013 automatic mailbox distribution takes place. The Mailbox Resources Management agent retrieves a list of the mailbox databases in the organization and removes from this list mailbox databases that are:

[ulist style=”8″]
Marked for exclusion from the distribution process (by default, exclusion is disabled for all DB)
Outside of the management scope applied to the current admin
Outside of the local Active Directory site
[/ulist]

Then, the agent randomly distributes mailboxes across the DB in the list. If you don’t want mailboxes to be distributed automatically, you can disable Mailbox Resources Management agent (with the “Disable-CmdletExtensionAgent”).

Alternatively, you can configure the provisioning parameters for the Mailbox Databases and specify which DB should be included or excluded in the Automatic Mailbox distribution process. The later approach is demonstrated in our demo.

You can download the [tip label=”script” style=”1″ href=”https://www.netometer.com/downloads/powershell/bulk-create-mbx.ps1″]bulk-create-mbx.ps1 How to Bulk Create Mailboxes in Exchange 2013[/tip] and [tip label=”CSV file” style=”1″ href=”https://www.netometer.com/downloads/powershell/NetoMeter.csv”]NetoMeter.csv How to Bulk Create Mailboxes in Exchange 2013[/tip] that we are using in the demo.

[raw]In the following short video How to Bulk Create Mailboxes in Exchange 2013, we demonstrate how to configure Exchange 2013 Mailbox Databases for Automatic Mailbox Distribution.[/raw]
Tweet #Exchange2013 Follow @netometer

Exclude-DB-From-Provisioning
  • How to Bulk Create Mailboxes in Exchange 2013
  • How to Install Exchange 2013
  • How to Upgrade from Exchange 2007 to Exchange 2013: Part 1
  • How to Install WordPress on Windows Server 2012
0 FacebookTwitterPinterestLinkedinWhatsappTelegramViberEmail
Exchange Server 2013Free Screencasts

Video: How to Bulk Create Mailboxes in Exchange 2013

by admin September 23, 2013


Free Video :Exchange 2013 Administration: How to Bulk Create Mailboxes in Exchange Management Shell

Exchange 2013 Admin Center (EAC) is easily accessible, but it provides quite a limited set of management options when performing bulk actions.

A typical example is creating multiple user mailboxes. Whether you have a list, provided by the HR department, or you are simply building a test lab, using Exchange Admin Center for this task is out of the question (unless you enjoy creating them one by one in EAC). Exchange Management Shell is the choice in this scenario – using a script or a heavy one-liner.

In this video, we start from scratch, creating a CSV file from a list of names generated by Random Name Generator web site.

Then, we discuss the details of our powershell script and how you can modify it according to your needs. Of course, you will see the script in action and the result of Exchange 2013 automatic mailbox distribution.

# Import data from the CSV file and store it in variable “$data”
$data = import-csv $args[0]
# Get the Active Directory FQDN of the current user
# You can specify it explicitly, if needed – ex. $FQDN = “netometer.local”
$FQDN = $env:userdnsdomain
# Cycle through each row from the CSV and feed the column values into variables
# We also encrypt the password, as the “New-Mailbox” command does  not accept plain text value
foreach ($i in $data)
{
$first = $i.First
$last = $i.Last
$name = $i.First + ‘ ‘ + $i.Last
$alias = $i.First[0] + $i.Last
$upn = $alias + “@” + $FQDN
$ou = $i.ou
$encryptedpass = ConvertTo-SecureString -AsPlainText $i.Password -Force
$resetpass = $false
new-mailbox -Firstname $first -LastName $last -Name $name -UserPrincipalName $upn -OrganizationalUnit $ou -Password $encryptedpass -ResetPasswordOnNextLogon $resetpass
}

You can download the [tip label=”script” style=”1″ href=”https://www.netometer.com/downloads/powershell/bulk-create-mbx.ps1″]bulk-create-mbx.ps1 How to Bulk Create Mailboxes in Exchange 2013[/tip] and [tip label=”CSV file” style=”1″ href=”https://www.netometer.com/downloads/powershell/NetoMeter.csv”]NetoMeter.csv  How to Bulk Create Mailboxes in Exchange 2013[/tip] that we are using in the demo.

[raw]In the following short video How to Bulk Create Mailboxes in Exchange 2013, we demonstrate how to bulk create mailboxes in Exchange 2013 with this powershell scriptbulk-create-mbx.ps1.[/raw]
Tweet #Exchange2013 Follow @netometer

Bulk-Create-Users-in-Exchange-2013
  • How to Exclude Mailboxes from Automatic Mailbox Distribution in Exchange 2013
  • How to Install Exchange 2013
  • How to Configure Outlook Anywhere in Exchange Server 2007
  • How to Install WordPress on Windows Server 2012
0 FacebookTwitterPinterestLinkedinWhatsappTelegramViberEmail
Newer Posts
Older Posts
November 2026
M T W T F S S
 1
2345678
9101112131415
16171819202122
23242526272829
30  
« Nov    

NetoMeter Blog

  • Video Updates
  • Upcoming Videos
  • Community Chatrooms
  • Community Forum
Facebook Twitter Rss Envelope

Useful Links

    • Contact Us
    • Collaboration
    • Adverstising
    • Privacy Policy
    • Feedback
    • Terms of Use
    • Help & Support
    • News Covering
    • Trending Now

Edtior's Picks

ACMEExchange Let’s Encrypt Client: How to Install a LE Certificate in Exchange Server
Coming Soon: How to Migrate File Servers to Server 2022
Screencast (Part 2): How to Upgrade from Exchange 2013 to Exchange 2019

Latest Articles

ACMEExchange Let’s Encrypt Client: How to Install a LE Certificate in Exchange Server
Coming Soon: How to Migrate File Servers to Server 2022
Screencast (Part 2): How to Upgrade from Exchange 2013 to Exchange 2019
Screencast: How to Upgrade from Exchange 2013 to Exchange 2019
NetoMeter Blog
  • Home
  • Windows Server
  • Exchange Server
  • SharePoint
  • Tools
    • ACMEExchange Client
NetoMeter Blog
  • Main Site >>
  • Home
  • Windows Server
  • Exchange Server
  • SharePoint
  • Latest Videos
  • Upcoming
©2024 NetoMeter All Right Reserved.