NetoMeter Blog
Main Site >>
NetoMeter Blog
NetoMeter Blog
Latest Videos
  • Home
  • Windows Server
  • Exchange Server
  • SharePoint
  • Tools
    • ACMEExchange Client
Main Site >>
Monday, November 9, 2026
NetoMeter Blog
NetoMeter Blog
  • Main Site >>
  • Home
  • Windows Server
  • Exchange Server
  • SharePoint
  • Latest Videos
  • Upcoming
Main Site >>

©2024 NetoMeter All Right Reserved.
Exchange Server 2013Free Screencasts

Exchange 2013 – EAC Frequently Crashes

by admin September 21, 2013


Free Video :Exchange 2013 Common Problems: Exchange Admin Center Crashes in Internet Explorer 10

That’s quite an unpleasant glitch which usually happens on a freshly installed Exchange 2013. When you try the Exchange Admin Center (EAC), it crashes intermittently without any logic. It turns out that the problem is in Internet Explorer 10 – you are missing an important update.

In the following short video, we demonstrate the problem and its quick resolution.

EAC-crashing
  • “Discovery Search Mailbox has been corrupted” error when upgrading from Exchange 2007 to Exchange 2013
  • Exchange 2013 – Custom Receive HubTransport Connector Problem
  • How to Bulk Create Mailboxes in Exchange 2013
  • How to Install Exchange 2013
0 FacebookTwitterPinterestLinkedinWhatsappTelegramViberEmail
Exchange Server 2013

Screencast: How to Upgrade Exchange 2007 to Exchange 2013 – Part 1

by admin September 16, 2013
Part 1:

  • Active Directory prerequisites and health check
  • Exchange 2007 prerequisites, preparation and health check
  • Preparing the schema, checking replication, confirming Schema version and msExchProductId on all DC
  • Adding required features and components, installing Exchange 2013
  • Validating Exchange 2013 installation, testing the mail flow between Exchange 2007 and Exchange 2013

[floated align=”left”]Exchange 2013[/floated]is a complex product that relies on the correct configuration and functionality of the underlying network and Active Directory infrastructure more than any previous version. While a [tip label=”Greenfield installation” style=”1″ href=”https://www.netometer.com/video/tutorials/How-to-Install-Exchange-2013″]Screencast: How to Install Exchange 2013 [/tip] is performed usually on a fresh and healthy Active Directory, Exchange 2013 upgrade requires a thorough analysis and health check of the existing AD and Exchange organization.
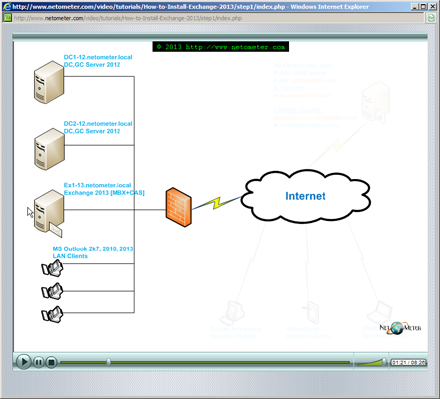
To keep things simple, we have split the Screencast in two parts. In part one, we verify and prepare our organization for the installation of Exchange 2013. Documenting custom connectors that need to be re-created later, exporting the existing transport rules, creating reports for the size of the databases and individual user mailboxes are some of the important tasks that will be demonstrated here.

Even though Active Directory preparation is incorporated in Exchange setup, you should seriously consider extending the schema and preparing AD it in advance. As you will see, confirming that all Domain Controllers in the forest report the correct Schema version and “msExchProductId” is an additional test for early detection of AD configuration and replication problems.

Validating the Exchange 2013 installation, examining the event logs, and testing the Exchange services health and mail flow is an important part of the whole process.

[raw]In this Screencast How to Upgrade Exchange 2007 to 2013, we demonstrate how to upgrade Exchange 2007 to Exchange 2013.[/raw]

How to Upgrade Exchange 2007 to Exchange 2013: Part1
  • How to Install Exchange 2013
  • How to Upgrade Exchange 2007 to Exchange 2013: Part2
  • How to Configure Outlook Anywhere in Exchange Server 2007

Tweet #Exchange2013 Follow @netometer

Stay tuned on NetoMeter – subscribe to NetoMeter RSS.

Dean

0 FacebookTwitterPinterestLinkedinWhatsappTelegramViberEmail
Install Exchange 2013
Exchange Server 2013

Screencast: How to Install Exchange Server 2013 on Windows Server 2012

by admin August 6, 2013

As with every new version, Exchange 2013 brings a lot of new features which make it a compelling choice, as a messaging and collaboration solution, for the enterprise. The main focus of this release is:

  • The ease of management – the server roles are reduced to Mailbox and Client Access
  • Lowering the cost of deployment
  • Stability and resistance to failure

In the following Screencast Screencast: How to Configure DHCP Failover in Windows Server 2012, we demonstrate how to install Exchange 2013 RTM CU2 v2 (the re-released version – 15.00.0712.024) on Windows Server 2012. As usual, we start with Active Directory requirements and health check, as this is a fundamental prerequisite for successful Exchange 2013 installation.

Small details, which are often overlooked (like a domain name containing underscore), can have a profound effect on the result of the installation process. That is the reason we spend a significant amount of time and efforts on the preparation of Active Directory and the new Exchange 2013 server. Finally, we demonstrate different ways to validate and test the Exchange 2013 server installation.

Install Exchange 2013


Tweet #Exchange2013 Follow @netometer

Stay tuned on NetoMeter – subscribe to NetoMeter RSS.

Dean

0 FacebookTwitterPinterestLinkedinWhatsappTelegramViberEmail
How to Configure DHCP Failover in Windows Server 2012
Latest ScreencastsWindows Server 2012

Screencast: How to Configure DHCP Failover in Windows Server 2012

by admin July 21, 2013

Reliable DHCP service is crucial to clients’ normal network connectivity. While the Split-Scope configuration has been a de facto standard for a long time, it’s been accompanied by two major short-comings.

– Lack of IP addresses continuity in case of DHCP server failure.
– Totally unsuitable for highly utilized scopes.

Another High Availability (HA) solution has been the DHCP cluster deployment. Naturally, this HA option has been available strictly to enterprises with the corresponding budget and expertise. Besides of its complex configuration and maintenance DHCP cluster solution comes with a single point of failure – the shared storage.

And now we have an elegant and superior HA solution, introduced with Server 2012 DHCP Failover.

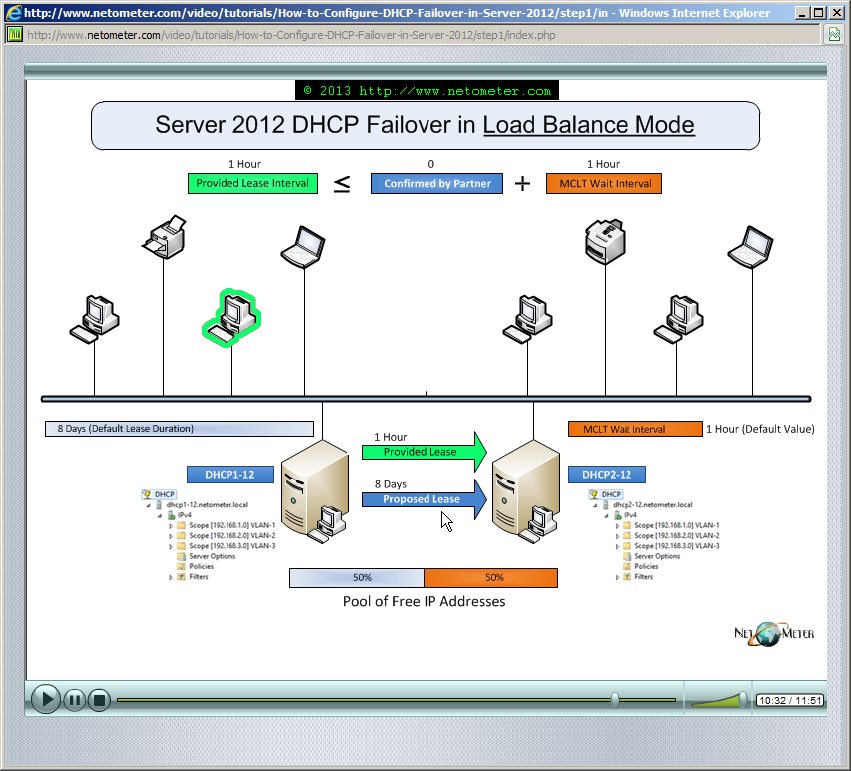
In the following Screencast Screencast: How to Configure DHCP Failover in Windows Server 2012, we demonstrate how to configure DHCP Failover in Load Balance mode in windows Server 2012.

How to Configure DHCP Failover in Windows Server 2012


Tweet #DHCPFailover Follow @netometer

Stay tuned on NetoMeter – subscribe to NetoMeter RSS.

Dean

0 FacebookTwitterPinterestLinkedinWhatsappTelegramViberEmail
Digitally Sign and Encrypt Email
Exchange Server 2003

Screencast: Digitally Sign and Encrypt Email

by admin July 21, 2013

Email communication is critical for business, but unfortunately it remains vulnerable to security flaws. Email spoofing and SMTP messages sent in plaintext are typical examples. Despite all efforts to keep systems and networks secure and protected, it is not uncommon to see credentials and passwords sent in plaintext via emails; messages pretending to be sent from our bank or trusted partners appear daily in our mailbox.

In the following Screencast Online Screencast, we demonstrate how to request and install a personal email certificate, and how to digitally sign and encrypt emails with it.

Backing up your personal certificate and keeping it in a safe location is crucial. We demonstrate how to export your certificate to PFX file, and how to install it on different OS and email clients.

Digitally Sign and Encrypt Email

Tweet #SecureEmail Follow @netometer

Stay tuned on NetoMeter – subscribe to NetoMeter RSS.

Dean

0 FacebookTwitterPinterestLinkedinWhatsappTelegramViberEmail
How to Migrate DHCP Server to Windows Server 2012
Latest ScreencastsWindows Server 2012

How to Migrate DHCP Server to Windows Server 2012

by admin June 5, 2013

Migrating existing services and server roles is an important part of the Server 2012 upgrade process.

In the following Step-by-Step video tutorial, we demonstrate how to move your existing DHCP configuration and leases to DHCP 2012 Server. There are several ways you can perform this migration:
– using netsh utility (doesn’t export complex configurations – ex. multicast scopes)
– using Powershell Export/Import cmdlets in Server 2012 (same limitations as above, does not work with 2003 DHCP servers)
– using Server 2012 migration tools (requires extra admin efforts – installing server migration tools)

In our Screencast, we demonstrate the last approach – using Server 2012 migration tools (smigdeploy.exe).

How to Migrate DHCP Server to Windows Server 2012

Stay tuned on NetoMeter – subscribe to NetoMeter RSS.

Dean

0 FacebookTwitterPinterestLinkedinWhatsappTelegramViberEmail
Windows Server 2012

Screencast: How to Upgrade Active Directory Domain to Windows Server 2012

by admin May 12, 2013
To ADPREP or not to ADPREP, and do we need the GPPREP switch

In our step-by-step Screencast, we demonstrate how to upgrade an existing Active Directory domain to windows server 2012, by adding an additional Windows 2012 Domain controller. As you will see, forest and domain preparation is performed automatically when you run the new Active Directory Domain Services configuration wizard.

So far so good. Veterans, with experience in Active Directory upgrades, remember the ADPREP tool which had to be run on legacy Domain Controllers. Microsoft provided two versions of the tool – ADPREP.EXE (x64 version) and ADPREP32.exe (x86 version). Finding and running the correct version definitely complicated the whole upgrade process.

ADPREP /GPPREP when upgrading to Server 2012

You can still prepare manually an existing Active Directory domain, by running ADPREP and that approach makes sense in a large deployments, with specific requirements and security procedures, related to AD Schema Extensions. In this case, you need to keep in mind that:

    • ADprep comes only as a 64 bit version in Server 2012 and is located under the “Support” folder on the installation disk.

Fig.1
Fig.1 ADPrep – available only as x64 version in Server 2012

    • If you try to run ADPREP on a legacy Windows Server 2003/2003 R2, you will get the error message “adprep.exe is not a valid Win32 application”, even if the server is running x64 OS.

Fig.2
Fig.2 Error Message “adprep.exe is not a valid Win32 application”, when running ADPREP on Server 2003/2003 R2

    • You can run ADPREP remotely from a Windows Server 2012 or Windows 8 (x64 version). The tool connects automatically to the corresponding DC – Schema Master for forestprep, and Infrastructure Master for domainprep. In our demo we perform this operation from our new Server 2012 Domain Controller

Fig.3
Fig.3 Running ADPREP remotely from Server 2012

And here comes the question – Do we need Group Policy Preparation?

This is performed with the GPPREP switch, where the whole command is “adprep.exe /domainprep /gprep”. It is important to note, that when you are using the GUI – Active Directory Domain Services Configuration Wizard:

  • Group Policy preparation (GPPREP) is not performed automatically
  • You will not get a warning, if you need GPPREP

So, when do we need Group Policy preparation and how do we check if it has been performed?

The short answer is: You don’t need Group Policy preparation, if you’ve never had Windows Server 2000 Domain Controllers in the Domain. Moreover, GPPREP needs to be run only once. If you’ve run GPPREP, when upgrading to Windows Server 2003 or 2008, you don;t need to repeat the process.

The last question is: How do we know, that GPPREP has been performed on the domain?

The rule of thumb here is: If you are not sure, just run the command again.
Fig.4
Fig.4 How to check whether GPPREP is required

Tweet #Server2012 Follow @netometer


Stay tuned on NetoMeter – subscribe to NetoMeter RSS.

Dean

0 FacebookTwitterPinterestLinkedinWhatsappTelegramViberEmail
Windows Server 2012

Screencast: How to Add a Second Server 2012 Domain Controller

by admin March 28, 2013

In this step-by-step video tutorial, we demonstrate how to add an additional Windows 2012 Domain controller to an existing Server 2012 forest.

Screencast: Adding a Second Server 2012  Domain Controller

In step1 of the Screencast, we prepare our new server and install AD DS role:
Fig.1
Fig.1 Add AD-DS Services Role (Server 2012)

Next, we check if the server is ready for promotion and run AD-DS Configuration wizard:
Fig.2
Fig.2 Server Manager – Promote a Domain Controller (Server 2012)

Fig.3
Fig.3 Server Manager – DCPROMO Deplyment Configuration Dialog (Server 2012)


If you hit problems during the prerequisites checks, you can resolve them and rerun the prerequisites checks again:
Fig.4
Fig.4 Server Manager – Add 2012 DC – Rerun Prerquisites Check (Server 2012)


In the last step, we validate the new DC promotion, check AD replication and discuss the various tools you might need in case there are issues:

Fig.5
Fig.5 Add 2012 DC – Check AD Replication

Fig.6
Fig.6 Add 2012 DC – Check SYSVOL and NETLOGON Shares

Finally, we demonstrate how to move some of the FSMO roles to the new Server 2012 Domain Controller.


Tweet #Server2012 Follow @netometer

Stay tuned on NetoMeter – subscribe to NetoMeter RSS.

Dean

0 FacebookTwitterPinterestLinkedinWhatsappTelegramViberEmail
Windows Server 2012

How to Add AD DS and Promote Windows 2012 Domain Controller

by admin February 10, 2013

In this step-by-step video tutorial, we demonstrate the instillation and configuration of a Windows Server 2012 Domain Controller in a new forest/new domain scenario.

Video: How to Promote Windows 2012 Domain Controller

In step1 of the Screencast, we configure the server with a static name and IP address:
Step1: Configure Name and Static IP for 2012 DC
Step 1: Configure Name and Static IP for 2012 DC.

and then we add Active Directory Domain Services role in Server Manager:
Step1: Add AD DS 2012 role
Step 1: Add AD DS 2012 role.

Adding Active Directory Domain Services (AD DS) role just installs the required binaries on our server. You don’t have to promote immediately the server as a domain controller, and that could be especially useful when preparing a DC for a remote office. In step 2, we demonstrate the promotion of a new Windows 2012 Domain Controller:
Step2: Promote 2012 Domain Controller
Step 2: Promote 2012 Domain Controller.

In step3, we validate the domain controller promotion:
Step3: Validate 2012 Domain Controller promotion
Step 3: Validate 2012 Domain Controller promotion.

and run Active Directory 2012 BPA (Best Practices Analyzer):
Step3: Run AD DS 2012 BPA
Step 3: Run AD DS 2012 BPA.

At the end, we demonstrate troubleshooting of common errors and warnings:
Step3: Common Errors and Warnings
Step 3: Common Errors and Warnings.

Tweet #Server2012 Follow @netometer

Stay tuned on NetoMeter – subscribe to NetoMeter RSS.

Dean

0 FacebookTwitterPinterestLinkedinWhatsappTelegramViberEmail
Exchange Server 2010Windows Server 2008

How to Generate Exchange 2010 Self Signed Multiple Domain Certificate

by admin January 27, 2013

In this step-by-step video, we demonstrate how to replace the default Single Domain, Exchange 2010 self-signed certificate (or an expired one) with a self-signed multiple domain (UCC) certificate.

Screencast: How to Generate Exchange 2010 Self Signed Multiple=

In step1 of the Screencast, we check the existing certificates on our Exchange 2010 CAS and generate a new self-signed, Exchange 2010 Multiple Domain certificate:

Step 1 – generate self-signed UCC
Step 1: Generate a new self-signed Exchange 2010 Multiple Domain certificate.

The new certificate is not trusted both by domain (local) and remote clients. In step2 we export the generated self-signed UCC with its public key:
Step 2 – export certificate
Step 2: Export the generated self-signed UCC with its public key.

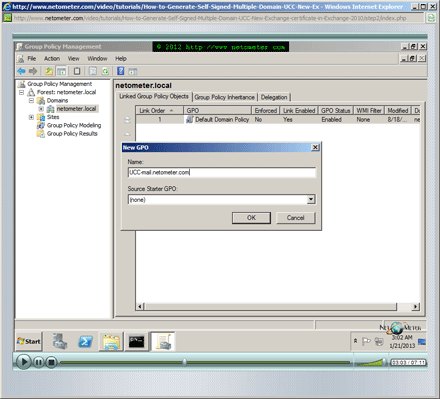
Then, we create a new Group Policy, and add the certificate as a trusted root certificate to all domain clients:
Step 2 – create GPO
Step 2: Create a GPO to add a trusted certificate to Domain Clients.

In step 3, we publish the certificate to the web server running OWA:
Step3: Publish Self-signed UCC to OWA site
Step 3: Publish Self-signed UCC to OWA web site.

Then we download and install it on a remote client. The new self-signed UCC certificate is tested by running OWA and configuring Outlook Anywhere on the remote client:
Step3: Import Self-signed UCC Public Key
Step 3: Import Self-signed UCC Public Key.

Tweet #Exchange2010 Follow @netometer

Stay tuned on NetoMeter – subscribe to NetoMeter RSS.

Dean

0 FacebookTwitterPinterestLinkedinWhatsappTelegramViberEmail
Newer Posts
Older Posts
November 2026
M T W T F S S
 1
2345678
9101112131415
16171819202122
23242526272829
30  
« Nov    

NetoMeter Blog

  • Video Updates
  • Upcoming Videos
  • Community Chatrooms
  • Community Forum
Facebook Twitter Rss Envelope

Useful Links

    • Contact Us
    • Collaboration
    • Adverstising
    • Privacy Policy
    • Feedback
    • Terms of Use
    • Help & Support
    • News Covering
    • Trending Now

Edtior's Picks

ACMEExchange Let’s Encrypt Client: How to Install a LE Certificate in Exchange Server
Coming Soon: How to Migrate File Servers to Server 2022
Screencast (Part 2): How to Upgrade from Exchange 2013 to Exchange 2019

Latest Articles

ACMEExchange Let’s Encrypt Client: How to Install a LE Certificate in Exchange Server
Coming Soon: How to Migrate File Servers to Server 2022
Screencast (Part 2): How to Upgrade from Exchange 2013 to Exchange 2019
Screencast: How to Upgrade from Exchange 2013 to Exchange 2019
NetoMeter Blog
  • Home
  • Windows Server
  • Exchange Server
  • SharePoint
  • Tools
    • ACMEExchange Client
NetoMeter Blog
  • Main Site >>
  • Home
  • Windows Server
  • Exchange Server
  • SharePoint
  • Latest Videos
  • Upcoming
©2024 NetoMeter All Right Reserved.