

NetoMeter Blog
Main Site >>
NetoMeter Blog
NetoMeter Blog
Latest Videos
  • Home
  • Windows Server
  • Exchange Server
  • SharePoint
  • Tools
    • ACMEExchange Client
Main Site >>
Monday, November 9, 2026
NetoMeter Blog
NetoMeter Blog
  • Main Site >>
  • Home
  • Windows Server
  • Exchange Server
  • SharePoint
  • Latest Videos
  • Upcoming
Main Site >>

©2024 NetoMeter All Right Reserved.
Windows Server 2008

How to Move Windows Server 2003 DHCP Configuration and Database to Windows Server 2008 R2, using Windows Server 2008 R2 Migration Tools.

by admin June 12, 2011

Migrating the existing DHCP configuration and database allows you to switch seamlessly DHCP servers. All DHCP scopes, scope options, reservations, active leases are transferred transparently from clients’ perspective.

One of the approaches for DHCP migration is to export/import DHCP database with the netsh dhcp server command. This might seem an easy and straight forward approach, but in reality you might experience problems (like importing leases, reservations etc).

In the following Step-by-Step video tutorial, you will see another approach – using Windows Server 2008 R2 Migration Tools to move an existing DHCP server configuration and database to Windows Server 2008 R2. The source DHCP server in our demo is running Windows Server 2003 R2. The destination/new DHCP server is running Windows Server 2008 R2.

How to Move Windows Server 2003 DHCP Configuration and Database to Windows Server 2008 R2, using Windows Server 2008 R2 Migration Tools.

Stay tuned on NetoMeter – subscribe to NetoMeter RSS.

Dean

0 FacebookTwitterPinterestLinkedinWhatsappTelegramViberEmail
Exchange Server 2010

How to Configure E-mail Address As User Principal Name. Bulk Modifying UPN in Exchange Management Shell

by admin April 29, 2011

User accounts in Active Directory have two types of logon credentials: pre-Windows 2000 (or the so called down-level) logon name, and UPN (User Principal Name). The UPN is the preferred logon method, according to Microsoft documentation. By convention, the UPN should map the user’s e-mail address. That will consolidate the e-mail and logon namespaces so that the user will have to remember and use a single name.

The UPN which you see and which you can modify, in Active Directory Users and Computers or in Active Directory Administrative center is the so called explicit User Principle Name. It’s value is stored in the userPrincipleName attribute of the user account. As we demonstrate in Step1, there is one more UPN, associated with each account – the Implicit User Principle Name. It is based on the sAMAccountName attribute and the Active Directory DNS domain name of the account. You cannot delete the implicit UPN, and modifying the sAMAccount name changes automatically the implicit UPN. In addition, Active Directory always uses the implicit UPN in Kerberos authentication.

For you convenience, Microsoft provides one more UPN – the so called UPN with flat domain name, which uses the NetBIOS AD domain name, instead of the DNS one.

In the following Step-by-Step video tutorial, we discuss the different types of UPN and demonstrate their use on local domain clients (Windows XP and Windows 7) and remote (Outlook Web App and Outlook Anywhere) clients.

Next we focus on adding UPN suffixes:

– For the whole forest, in Active Directory Users and Computers

– For specific Organization Unit, in ADSIEDT.msc

Then we compare the use of Active Directory Administrative Center and Active Directory Users and Computers and outline some of the limitations of the latter when specifying UPN suffix for a specific OU.

Finally, we demonstrate how to bulk modify the explicit UPN in Exchange Management shell to match the e-mail address of the accounts.

How to Configure E-mail Address As User Principal Name. Bulk Modifying UPN in Exchange Management Shell

Stay tuned on NetoMeter – subscribe to NetoMeter RSS.

Dean

0 FacebookTwitterPinterestLinkedinWhatsappTelegramViberEmail
Exchange Server 2010

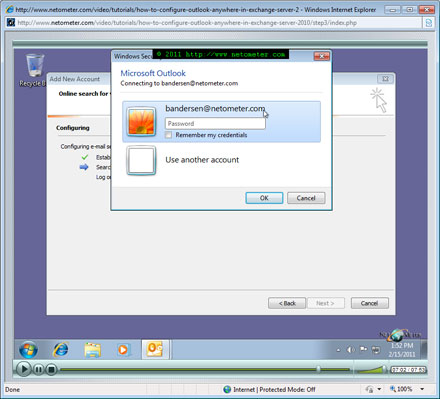
How to Configure Outlook Anywhere in Exchange Server 2010

by admin February 18, 2011

If you have already installed an SSL certificate and allowed your remote clients to use OWA (Outlook Web App), as we have demonstrated in our Screencast:
How to Install GoDaddy Multiple Domain (UCC) SSL Certificate in Exchange 2010 then configuring Outlook Anywhere is the next logical step. The advantages of this feature are:
– Users get full access to their mailboxes over virtually any network without the need of a VPN solution or additional firewall rules
– You can use the same URL that you use for Outlook Web App and Microsoft Exchange ActiveSync
– You can use the same SSL certificate implemented for Outlook Web App and Exchange ActiveSync
– Unauthenticated requests from Outlook cannot access Exchange Server

The SSL certificate which you are using on your Exchange 2010 Client Access server is one of the key factors which determine the configuration steps which you should follow.
Using a trusted Multiple Domain SSL certificate is the easiest (and recommended) scenario and we will start with it. As you will see in our demo, this allows fully automated client configuration of autodiscover capable remote clients – MS Outlook 2010 and Outlook 2007, based solely on the users e-mail address. MS Outlook 2003 clients require manual configuration. We demonstrate it (Step3), as it is a good idea to be able to perform a manual Outlook Anywhere configuration (even with autodiscover capable clients) as part of your troubleshooting techniques.
Your other SSL certificate options are:
– Generating and using a Self-Signed Multiple Domain Certificate
– Configuring a Microsoft CA and issuing a Multiple Domain Certificate, signed by it
– Using a trusted Single Domain SSL certificate and configuring an Autodiscover SRV record in your external DNS zone

In our demo, we are using a Single Exchange Server 2010 SP1 installed on a Windows Server 2008 R2.

How to Configure Outlook Anywhere in Exchange Server 2010

Stay tuned on NetoMeter – subscribe to NetoMeter RSS.

Dean
0 FacebookTwitterPinterestLinkedinWhatsappTelegramViberEmail
Exchange Server 2010

How to Install GoDaddy Multiple Domain (UCC) SSL Certificate in Exchange 2010

by admin February 2, 2011

Out of the box Exchange 2010 comes with a self-signed certificate, generated and assigned automatically to exchange services during the installation of the Client Access Server role. It is provided as a temporary certificate – just to get you started, and it should be replaced as soon as possible.

There are three types of SSL certificates which you can use with Exchange server 2010:

1. Trusted Third-Party (commercial) Certificates – as the name suggests, they are issued by trusted CA (Certificate Authorities) and you have to pay for them. You can request and install a Multiple Domain certificate – also known as SAN (Subject Alternative Name), or UCC (Unified Communications Certificate). This is the recommended certificate for Exchange 2010 and we demonstrate how to request and install a GoDaddy Multiple Domain (UCC) certificate in this screencast.
Alternatively, you can request and install a Single Name certificate, which requires significant administrative efforts on your side – configuring split DNS, adjusting SCP and Web Services URL, configuring a SRV record in the external DNS zone, and still there will one time security (redirection) popup for the remote Outlook Anywhere clients.

2. Windows Public Key Infrastructure Certificates – in plain words this means installing and using a stand alone (we have already demonstrated this approach with Exchange 2007) or Enterprise Windows CA.

3. Self-signed certificate. Like the default, out of the box Exchange 2010 certificate, it is generated by Exchange server and valid for 5 years, but you can choose the included Common name and Subject Alternative names.

Ideally, you should be purchasing and installing a Multiple Domain (UCC) SSL certificate

In the following Step-by-Step video tutorial, you will see how to install and configure GoDaddy Multiple Domain (UCC) SSL Certificate in Exchange Server 2010.

How to Upgrade to Windows Server 2008 Hyper-V RTM

Stay tuned on NetoMeter – subscribe to NetoMeter RSS.

Dean

0 FacebookTwitterPinterestLinkedinWhatsappTelegramViberEmail
Exchange Server 2003Exchange Server 2010

How to Upgrade from Exchange 2003 to Exchange 2010 SP1: Part 2. Quick Upgrade Scenario.

by admin January 19, 2011

In Part 2 we demonstrate the quick upgrade scenario – following our usual Step-by-Step approach. Our main goal is to provide detailed, from start to finish instructions about the upgrade process from Exchange 2003 to Exchange 2010 SP1.

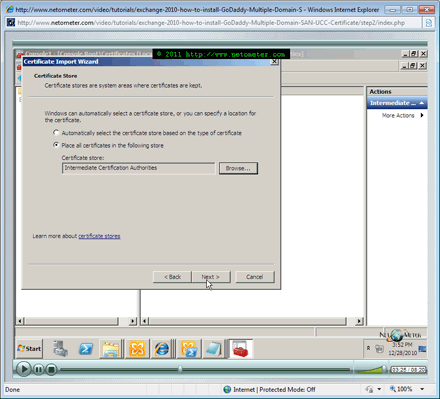
To keep the logical flow of the upgrade uninterrupted, we have included the installation of a GoDaddy Multiple Domain SSL certificate/UCC, instead of publishing a separate Screencast about it. The correct installation and configuration of Multiple Domain certificate in Exchange 2010 SP1 is crucial to completing the upgrade with minimal interruption to the end users, so we focus a lot of our attention on it – Step3 and Step4.

Moving the mailboxes is probably one of the most hectic moments. We demonstrate how to perform and monitor the move both in Exchange Management Console and Exchange Management Shell (especially useful if you have to bulk move a large number of mailboxes). Once the process completes, we test the result using local clients (both cases – when the client is up and running and when the client is closed) and remote clients (OWA, Outlook Anywhere and ActiveSync). Often, one of the overlooked tasks is Moving All Public Folder replicas.

If there are issues with Public Folder replication, this could bring your upgrade to a stall. As you will see, Exchange 2003 cannot be decommissioned until the list of Public Folder Replicas on the server is empty. Following the principle that it’s better to be prepared and expect problems than to be surprised, we show you how to configure and use diagnostic logging and message tracking on both exchange servers, and how to monitor the public folder replication. If you are pressed on time we discuss an option to speed up the replication process.

How to Upgrade to Windows Server 2008 Hyper-V RTM

Stay tuned on NetoMeter – subscribe to NetoMeter RSS.

Dean
0 FacebookTwitterPinterestLinkedinWhatsappTelegramViberEmail
Exchange Server 2003Exchange Server 2010Free Screencasts

How to Upgrade from Exchange 2003 to Exchange 2010 SP1. Part 1

by admin November 12, 2010

We have already demonstrated the installation of Exchange Server 2010:
How to Install Exchange 2010 on Windows Server 2008 R2

which is the so called Greenfield installation – implementing a new Exchange organization. In real life, most probably you will have to introduce Exchange 2010 SP1 into an existing Exchange environment.

When we are talking about Exchange 2010 SP1, we should be aware that SP1 is much more like a full-fledged release than a mere update of Exchange Server 2010; it includes a lot of bug fixes and a huge amount of new functionality.

Having in mind that many organizations are still running Exchange 2003, it comes as no surprise that transitioning from Exchange 2003 to Exchange 2010 SP1 is one of the most important upgrades of the present day.

This is a serious project covering a lot of ground. To be able to keep our detailed step-by-step approach and make it easier for you to follow, we have split this Screencast in two parts.

In Part 1, we focus our attention on the required health checks and preparation of your existing Active Directory and Exchange 2003 organization. You will see a typical Exchange 2010 SP1 installation on a member server running Windows Server 2008 R2. Finding the correct updates required by SP1 might be confusing, so we dedicate a separate step (Step4) to your server preparation and prerequisites.

Sometimes you might come into a situation, when Exchange 2010 SP1 setup fails at the prerequisites checks – like missing a required update. In our last step, we cover such an example and show you how to avoid the mistake, leading to a missing two-way Exchange 2003 <-> Exchange 2010 routing group connector.

How to Upgrade from Exchange 2003 to Exchange 2010 SP1. Part 1

Stay tuned on NetoMeter – subscribe to NetoMeter RSS.

Dean

0 FacebookTwitterPinterestLinkedinWhatsappTelegramViberEmail
VirtualizationWindows Server 2008

How to manage Hyper-V Server 2008 R2 Remotely from Windows 7 in Workgroup

by admin September 6, 2010

Hyper-V Server 2008 R2 is a free standalone virtualization server.  The R2 release is an update to the Hyper-v Server 2008 which adds support for the following new key features:

– Support for up to 64 Logical Processors (up to 4 virtual processors per virtual machine)
– Host Clustering
– Live Migration
– Processor Compatibility Mode for live migration (live migration across different CPU versions within the same processor family)
– Improved network performance
– Improved VHD performance for dynamic and difference disks
– Hot Add/Remove of storage (VHDs and Pass Through Disks)
– Second Level Address Translation (SLAT) processor support
– Core Parking

There are cases when you would prefer to install and use the Hyper-V Server 2008 R2 as a standalone machine in a workgroup environment instead of as a member of a domain. This is where you will hit a problem when trying to connect and manage remotely your Hyper-V R2 server. You might get the following errors:

– “You do not have the required permissions to complete this task. Contact the administrator of the authorization policy for this computer”
– “An error occurred while attempting to connect to server. Check that the Virtual Machine Management service is running and that you are authorized to connect to the server”
– “RPC server unavailable. Unable to establish communication between …”

The scenario when you are using and managing Microsoft Hyper-V Server 2008 R2 remotely from Windows 7 in a workgroup requires special attention and configuration on both sides – the managed Server and the managing Client.

In the following Step-by-Step video tutorial,  we demonstrate an elegant, simple and easy to follow approach which will help you to configure correctly and manage remotely your Hyper-V R2 server from a Windows 7 workstation in a workgroup environment.

How to manage Hyper-V Server 2008 R2 Remotely from Windows 7 in Workgroup

Stay tuned on NetoMeter – subscribe to NetoMeter RSS.

Dean

0 FacebookTwitterPinterestLinkedinWhatsappTelegramViberEmail
Exchange Server 2010

How to Bulk Create/Modify User Accounts in Exchange Management Shell. Using Custom Attributes to Create Dynamic Distribution Groups.

by admin August 3, 2010

Bulk Creating and modifying user accounts in Active Directory is a common task which every administrator has met or will meet at some point of his career.

In the following Step-by-Step video tutorial, we will give you a simple algorithm which will allow you to perform easily bulk operations in Exchange Management Shell. We do not expect you to have any programming or PowerShell experience.

It is very possible that at some point you will feel the need to add information about your users that does not easily fit into the existing fields. Our last example is about modifying Exchange Custom Attributes and using them when creating Dynamic Distribution groups in Exchange Server 2010.

How to Bulk Create and Modify User Accounts in Exchange Management Shell. Using Custom Attributes to Create Dynamic Distribution Groups.

Stay tuned on NetoMeter – subscribe to NetoMeter RSS.

Dean

0 FacebookTwitterPinterestLinkedinWhatsappTelegramViberEmail
Exchange Server 2010

How to enable Anti-Spam Features on Exchange 2010 Hub Transport Server. Configuring and Testing SpamHAUS as IP Block List Provider. Switching between Standard an Enterprise Anti-Spam Updates.

by admin April 29, 2010

If your organization doesn’t use Edge Transport servers and has only Hub Transport servers, you should install and enable the anti-spam features on Hub Transport servers that receive messages from the internet. In this Step-by-Step Screencast we will demonstrate how to install, configure and test Anti-Spam functionality on Exchange 2010 Hub Transport Server.

A very efficient Anti-Spam feature is the use of IP Block List providers. In our demo we will show you how to configure and test SpamHAUS as a DNSBL – DNS-based Block List (or Blackhole, black list) provider. We will be using the combined and most powerful ZEN list – zen.spamhaus.org, and you will see different approaches to test your configuration.

One of the overlooked steps, when configuring Exchange 2010 anti-spam functionality is specifying the internal SMTP servers in the InternalSMTPServers parameter. This will be reflected in your logs as event ID 1022 (MSExchangeTransport) – Anti-spam agents are enabled, but the list of internal SMTP servers is empty.

Configuring and checking the Anti-Spam updates is also a very important task for the Exchange administrator. We compare the two update modes – manual and automatic, and the corresponding Standard and Enterprise Anti-Spam updates provided by Microsoft. You will see that even though the name of the update mode is manual, you can have your Standard Anti-Spam updates downloaded and installed automatically, and we will show you how to switch between manual and automatic Exchange 2010 Anti-Spam updates mode.

In the following Step-by-Step video tutorial, you will see how to enable Anti-Spam Features on Exchange 2010 Hub Transport Server.

How to enable Anti-Spam Features on Exchange 2010 Hub Transport Server. Switching between Standard an Enterprise Anti-Spam Updates. Configuring and Testing SpamHAUS as IP Block List Provider.

Stay tuned on NetoMeter – subscribe to NetoMeter RSS.

Dean

0 FacebookTwitterPinterestLinkedinWhatsappTelegramViberEmail
Exchange Server 2010

Exchange Server 2010 Initial Configuration – Configuring Send and Receive Connectors, Accepted Domains, E-mail Address Policy, Postmaster Address

by admin April 4, 2010

In the following Step-by-Step video tutorial, we will demonstrate Exchange 2010 initial configuration. We are using a single Exchange Server 2010 typical installation in a scenario without Exchange 2010 Edge Server. You will see the post installation steps that you have to go through to make your server functional.

These steps are required because out of the box a typical Exchange Server 2010 installation:
● is unable to receive e-mails from the Internet – anonymous SMTP connections are dropped, and that’s how most e-mail servers will send e-mails to your Exchange Server.
● does not configure any explicit Send Connectors, and is unable to send e-mails to the Internet.
● the default e-mail address policy and accepted domain are using the forest root FQDN (Fully Qualified Domain Name). In many cases, the external (e-mail) domain name which a company uses is different from the one used for Active Directory. It is also possible that you need to be able to accept e-mails for more than one e-mail domains.

As we are not using Edge server in our scenario, we will create manually Internet Send and Internet Receive Connectors, and we will set them to use our Exchange 2010 Server public Fully Qualified Domain Name. Finally, we will We will show you an easy way to check and configure external postmaster address, using the GUI – Exchange Management Console.

Following  the steps outlined bellow, you will have your Exchange Server 2010 up and ready to send and receive e-mails using the e-mail domain that you need.

Exchange Server 2010 Initial Configuration: Configuring Internet Send and Receive Connectors, Accepted Domain and E-mail Address policy. Setting External Postmaster Address

Stay tuned on NetoMeter – subscribe to NetoMeter RSS.

Dean

0 FacebookTwitterPinterestLinkedinWhatsappTelegramViberEmail
Newer Posts
Older Posts
November 2026
M T W T F S S
 1
2345678
9101112131415
16171819202122
23242526272829
30  
« Nov    

NetoMeter Blog

  • Video Updates
  • Upcoming Videos
  • Community Chatrooms
  • Community Forum
Facebook Twitter Rss Envelope

Useful Links

    • Contact Us
    • Collaboration
    • Adverstising
    • Privacy Policy
    • Feedback
    • Terms of Use
    • Help & Support
    • News Covering
    • Trending Now

Edtior's Picks

ACMEExchange Let’s Encrypt Client: How to Install a LE Certificate in Exchange Server
Coming Soon: How to Migrate File Servers to Server 2022
Screencast (Part 2): How to Upgrade from Exchange 2013 to Exchange 2019

Latest Articles

ACMEExchange Let’s Encrypt Client: How to Install a LE Certificate in Exchange Server
Coming Soon: How to Migrate File Servers to Server 2022
Screencast (Part 2): How to Upgrade from Exchange 2013 to Exchange 2019
Screencast: How to Upgrade from Exchange 2013 to Exchange 2019
NetoMeter Blog
  • Home
  • Windows Server
  • Exchange Server
  • SharePoint
  • Tools
    • ACMEExchange Client
NetoMeter Blog
  • Main Site >>
  • Home
  • Windows Server
  • Exchange Server
  • SharePoint
  • Latest Videos
  • Upcoming
©2024 NetoMeter All Right Reserved.