

Storage Tiering is one of the new features in Server 2012 R2. It brings a tremendous performance boost to the Storage Spaces that were introduced with Server 2012. While the Storage Spaces concept was met with mixed feelings by many enterprise engineers and administrators, the mounting interest towards this feature, due to the performance impact of native Storage Tiering and Write-Back Cache in the R2 version, is clearly palpable.
The whole process of configuring Storage Tiers with Server 2012 R2 is extremely simplified when using the graphical interface – Server Manager, and that’s what you will see in most demos. We do start with such an example in our Screencast, and then we take a closer look at some of the important Virtual Disk parameters (Number of Columns, Interleave, Write-Back Cache) that are configured automatically in the background by the wizard and affect most seriously the Storage Space performance. As you will find out, once the Virtual Disk is created, you cannot modify these parameters. The only way to change them is to delete and re-create the Virtual Disk. That brings the need to plan carefully, in advance your Storage Configuration.
We discuss in detail the meaning of these parameters and how to optimize them according to your needs in Step 2. Extending an existing tiered Storage Space is one of the typical examples when you need to be aware of these parameters before you proceed with adding the physical disks to the Storage Pool, and we demonstrate some of the most common mistakes.
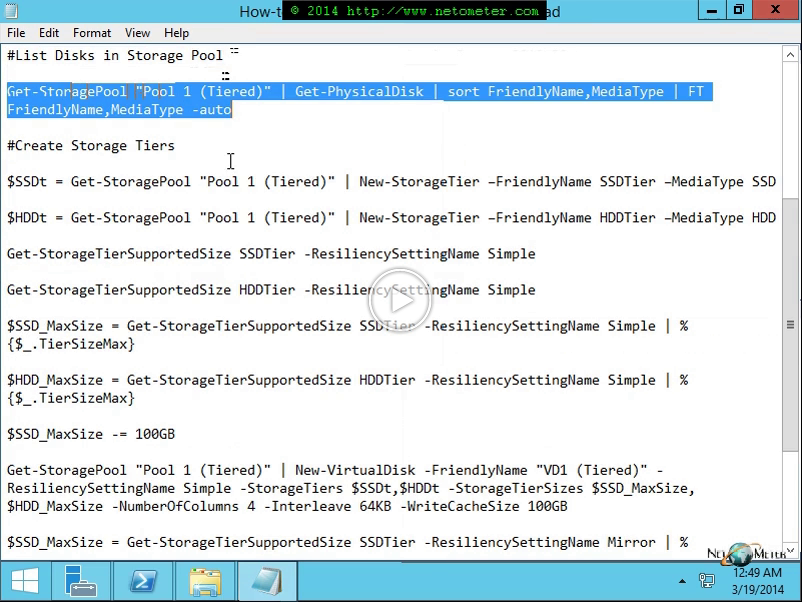
While the Graphical Interface is perfect for demonstration purposes, most probably you will have to use PowerShell when implementing Tiered Storage in a production environment. Optimizing the interleave for applications like Microsoft SQL Server or Exchange Server, configuring the Number of Columns, and setting the Write-Back Cache is possible only in PowerShell. Step 3 is packed with tips and PowerShell action, and for you convenience we provide the text file with all commands that are used in the demo.
One of the key moments is how the hot data is moved to the fast tier. We start with the default Storage Tiers Management task that is scheduled to run at 1:00 AM daily and practically is moving yesterday’s data to the SSD tier. Then we demonstrate the Optimize-Volume commandlet and the process of pinning/unpinning individual files, whole folders, or specific types of files to/from a specific tier.
The text file with our project plan and PowerShell commands used in the Screencast is available here here  .
.